

Global CU app notifications
Never miss a payment again—customize when and how the Global CU app notifies you.

Ready to take your finances to the next level? Here’s all you need to become a Global CU app expert
Yes, the new mobile app is a separate app, designed to give you greater control of your finances. You’ll get all the essential services of our branches right at your fingertips, as well as new digital tools designed to help you automatically track your budgets and manage your spending.
It’s free and currently available to all members with a personal account!
![]()
![]()
P.S. You may want to delete the former app, so you won’t get mixed up when managing your money from your phone.
Global CU app
![]()
Global CU for Business
![]()
Since this is your first time signing in to the new app, you’ll need your username and password.
Your username is your member account number unless you’ve changed it. You can find your account number under the accounts section of our current app, or in the top-right corner of your printed account statement.
If you forgot your password, you can reset it online using your username and email address. If you still need help with your username or password, the Member Service Center is available 24/7 at 800-525-9094.
No. The Global CU app ![]() is currently for non-business member use only. The Global CU for Business app
is currently for non-business member use only. The Global CU for Business app ![]() will remain active for business members. No action is needed for you to continue using it.
will remain active for business members. No action is needed for you to continue using it.
No. The special account types listed below are currently not compatible with the Global CU app ![]() . The Global CU for Business app
. The Global CU for Business app ![]() will remain active for use with these accounts.
will remain active for use with these accounts.
Never miss a payment again—customize when and how the Global CU app notifies you.
Keep track of your entire financial life—even accounts from other institutions.
Perhaps one of your financial institutions doesn’t support our software, or you’ve paid off a mortgage, so there isn’t an online account for it. If so, add a manual account to track things with a lot of value: a house, a car, cash, or a loan you’re paying back to a friend.
If you’re adding certain types of accounts like car loans or mortgages, it’s important to input the full value of the property associated with the account (like a house or car), so the app will track the positive value of your assets, not just your debt.
To add a manual account:
You can customize the Dashboard to show information in the order you want. Organize the Dashboard as often as you like.
To customize the Dashboard:
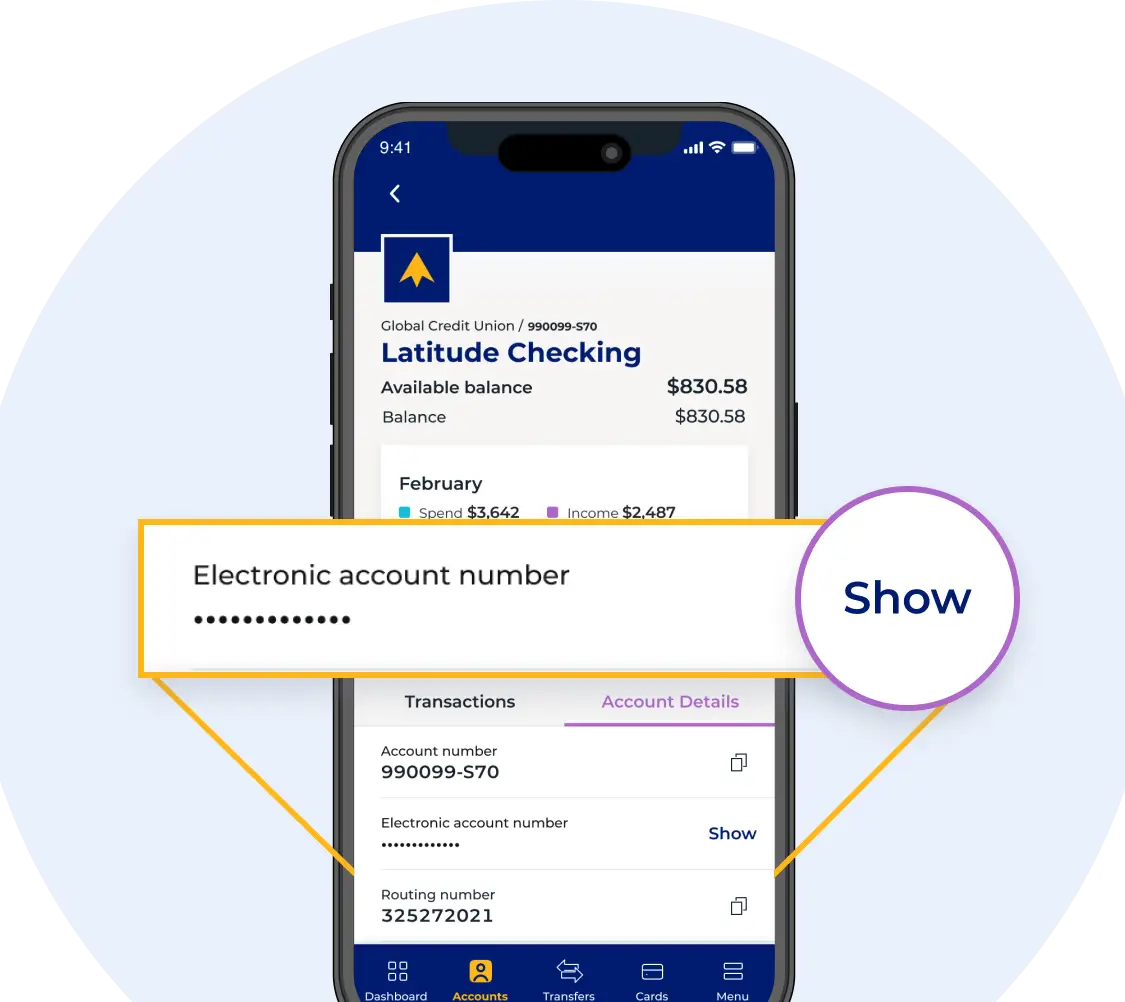
Your full account number for electronic deposits or payments can be found on a blank check, or in the Global CU app. To view your full account number: open the Global CU app, select a Global account, tap on 'Account Details', then tap 'Show' next to Electronic account number.
Learn how to move money between your Global accounts or send money to friends and family.
1. Open the Global CU app.
2. From the dashboard, tap "Deposits" then "Switch your direct deposit."
3. Follow the prompts. Early Payday is on the way!
Watch the step-by-step instructions
From the dashboard, tap Deposit Check. Select the account you’d like to deposit the money to and enter the check amount.
Take a clear, readable picture of the front and back of the check. To let the app take the picture for you, tap the toggle switch labeled “Auto Capture” at the top of the screen until it reads “on.”
Line up your check and the image on the screen; the app will take the picture when they’re aligned.
To capture manually, align the check inside the box and tap the camera button on the right side. Use the slider at the bottom to submit.
History of checks deposited through the app will appear under the “View Activity” tab.
From the dashboard, tap Transfers then select “Between my Global accounts”. Complete the transfer details (from account, to account, amount, frequency, and date) then slide to submit.
Scheduled transfers between your Global accounts will appear under the “View Activity” tab.
From the dashboard, tap Transfers then select “To another Global member”. Complete the transfer details (from account, recipient’s account number, last name and share type or loan ID, amount, frequency, and date) then slide to submit.
Scheduled transfers to another Global member will appear under the “View Activity” tab.
From the dashboard, tap Payments then select “Send money to friends & family.” Complete the payment details (from account, payee, amount, frequency, date, and a question and answer that recipient will know to receive the money) then slide to submit. The recipient will receive an email or text message with instructions on how to receive the money.
Scheduled transfers to a contact’s email or phone will appear in the “View Activity” tab.
From the dashboard, tap Payments then select “Pay a bill.” Complete the payment details (from account, payee, amount, frequency, and date) then slide to submit.
Scheduled bill payments set up through the app will appear under the “View Activity” tab.
Stay on top of where your money goes.
From the Dashboard, you’ll see the three most recent transactions made from all your accounts.
Tap "View All Transactions" at the bottom of the panel to see every transaction for every account, with the most recent at the top. Pending transactions will be displayed at the top, grayed out, and italicized.
Transactions that have been posted—i.e., they are no longer pending—are grouped by date. Each will show a name, a category like “Personal Care,” or “Gas,” and an amount. If a transaction was a credit to one of your accounts, the amount will have a plus sign and be green.
Pending ACH deposits and withdrawals can be found under Transactions in the dashboard. Pending debit card and credit card transactions are not viewable at this time.


Scheduled transfers or bill payments can be found under the respective “View Activity” tab for each of the transfer types listed below:
The app automatically categorizes every transaction for you, and it usually gets it right. Your trips to the grocery store will be categorized as “Groceries,” your trip to Subway will show up as “Fast Food,” and stopping at a Chevron to fill up your tank will show up as “Gas.”
However, sometimes the app can’t categorize something — like ATM visits or other ambiguous transactions. In these cases, the app marks them as “Uncategorized.” It’s up to you to put them in the right place.
In other cases, you may want to place something in a more specific category or move it from one place to another to match your personal preferences.
Getting things in the right category not only helps the app work better, but it will also help you know where you spend your money and improve your finances.
To deal with uncategorized transactions:
To recategorize a transaction:
To automatically create new budgets based on your spending:
A screen will appear with green, yellow, and red bubbles. These are your budgets. If you can’t see all of them, tap and drag on the bubbles until you find the one you're looking for. The rest will move out of the way automatically. Bigger bubbles mean bigger budgets. A green bubble means you still have money to spend in that category. A yellow bubble means you’ve spent over 80 percent of that budget. A red bubble means you’ve gone over that budget.
On the bottom left, a red bar and a green bar show the amount you have left to spend and how much of your projected income you have earned.
Near the top of the screen, you’ll see a month. The Budgets panel will display the current month when you first open it. To view how you did on past budgets, hit the back button until you find the month you’re looking for.
From the main Budgets window, tap any budget bubble to display more details.
The category bubble will show details about that budget category. Below, you’ll see a bar graph with your monthly spending in that category over the last year, along with a dotted line indicating how much you budgeted.
To change a budgeted amount:
To delete a budget entirely:
If you want your planning to be more specific, you can add budgets for existing subcategories or for categories you create yourself.
To create a sub-budget:
Once you’ve created a sub-budget, it will appear connected to its main budget in the details window. Tap a sub-budget to bring up more details, make edits, view transactions over the past year, or delete it.
On the Dashboard, the spending panel will display a colorful wheel and a list of categories. Each slice of color on the wheel represents how much you spent in the associated category. In the middle of the wheel, you’ll see how much you’ve spent in total over the last 30 days.
Swipe left on the panel to see your monthly spending and income histories over the last year in a bar graph, with a monthly average at the top.
Tap anywhere on the spending panel to bring up more details.
In the main window of the spending panel, a larger version of the spending wheel for the month will appear, along with a bar graph below for the past year, broken down by month.
From the main window of spending, tap the three dots on the top right to see your spending or income over time as a pie chart, over time, or as a list.
The “Pie Chart” visualization shows the spending wheel.
The “Over Time” visualization is a bar graph of your overall spending or income over the last 12 months. A line graph represents your income. The current month will be highlighted by default.
The “List” option will show each category listed by the percentage of your spending that it accounted for. The percentage will be on the left, and the dollar amount will be on the right.
The app automatically creates a personalized budget—here's how to tailor it to your goals.